170g Matte Offset Paper
- Excellent choice for text- and graphic-heavy brochures.
- Pleasant matte feel with no glare.
- Easy to read and write on.
- FSC, PEFC and EU Ecolabel certified.
Kyllä. Merkitse tilauksen yhteydessä, että toimitat aineiston myöhemmin. Muista ilmoittaa tilausnumero aineiston lähettämisen yhteydessä. Tuotantoaika alkaa vasta, kun aineisto on vastaanotettu ja hyväksytty painokelpoiseksi.
Saat onnistuneesta tilauksesta tilausvahvistuksen sähköpostitse. Tarkista tarvittaessa myös roskapostikansio. Ota yhteyttä, jos vahvistusta ei saavu pian tilaamisen jälkeen.
Kyllä, jos aiempi tilaus ja aineisto löytyvät järjestelmästämme. Ilmoita aiemman tilauksen numero ja kerro, haluatko työn täysin samanlaisena vai muutoksilla. Suosittelemme säilyttämään painoaineiston myös omassa arkistossasi.
Placing an order in the aDigi online store is simple and fast. Start by navigating to the product page of the printed item you want to order, such as flyers, business cards, posters, or other marketing materials.
When you select the product specifications, such as size, paper type, number of colors, and order quantity, our system automatically calculates the price in real time. You can review the total price before confirming your order.
Finalize your order through the checkout process. We offer flexible payment options, including card payment, e-invoicing for businesses, and advance payment via payment link. Once your order is confirmed, you will receive an order confirmation and tracking details by email.
Tip: If you need assistance with placing an order or would like a custom quote, please contact our customer service team – we’ll help you find the perfect solution for your company or event needs.
Yes, you can modify your order, but only before it has been sent to production. If you wish to make changes to your order, please contact our customer service team immediately by phone at +358 9 737001 and send a clear order modification request.
Please note that once the order has been sent and production has started, it can no longer be modified without additional costs. To avoid unnecessary fees and delays, please do not resubmit your order until you have received confirmation from our customer service team.
Once your order has been shipped, you can easily track its progress by logging into the aDigi online store and going to the My Orders section. Click the "Track My Order" button to view the real-time shipment tracking and delivery details.
You will also receive a confirmation email containing a direct tracking link, allowing you to monitor your order both through our online store and via the shipping provider's tracking system.
We offer instant online pricing for all our printed products, allowing you to check costs quickly and easily. The price of your order is clearly displayed on the Product Order page as soon as you select the desired options such as paper type, size, color quantity, and order volume. The price updates automatically based on your selections.
If you need a custom quote for special printing or a large order, please contact our support team by email at adigi@adigi.fi. We’ll help you find the best solution for your company or event needs.
We offer flexible payment options for businesses, organisations and consumer customers.
We run a credit check before invoicing. If there are issues with the credit information, payment is handled by card at pickup or in advance via payment link.
Payment by card at pickup or in advance via a payment link sent by email.
Need a reference on the invoice? Add the PO reference, order number or any other required reference when placing your order, and invoicing will run smoothly.
Processing time depends on the product and order quantity. Once we receive your order and print-ready files, we usually review the artwork within a few hours on weekdays. After that, the order moves into production.
Very urgent order? Call +358 9 737 001 and we'll secure the fastest possible schedule.
Shipping costs are calculated automatically at checkout before you confirm your order. The price depends on the weight and size of the package, the delivery address and the chosen shipping method.
You'll see the exact shipping cost at checkout before payment. For special requests or larger shipments, please contact us: adigi@adigi.fi.
The total delivery time consists of two parts: production time (order processing and printing) and shipping time (depends on the delivery method and address).
Tight schedule? Call +358 9 737 001 and we'll check the options for expedited production and delivery. We recommend placing your order about a week in advance to keep the schedule comfortable.
All prices displayed in the aDigi online store are accurate and final based on the selections you make at the time of ordering. The prices are calculated using each product’s standard sizes, materials, and printing techniques, ensuring full cost transparency before you confirm your order.
If you need a custom printed product – for example, a non-standard size, special finishing, or a very large quantity – the exact price may not appear directly in the online store. In these cases, we will provide you with a personalized quote based on your specific requirements.
You can view the final price directly in your cart before completing the payment. If you need a tailored solution or can’t find the exact product you are looking for, contact our customer service team to request a personalized quote. This ensures you receive a solution that fits your needs at a competitive price.
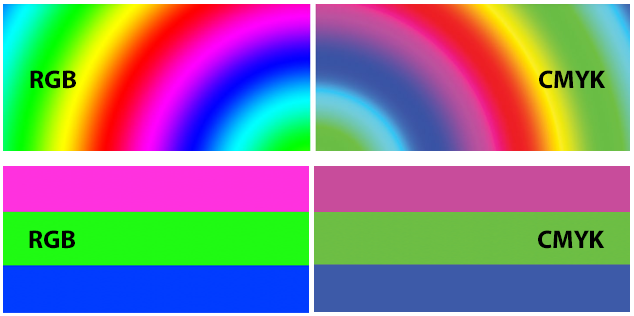
Yes – our system accepts RGB files, and we convert them into CMYK colour space (cyan, magenta, yellow, black) for printing. You can send your files as is, with no need to convert them yourself.
Need precise colour control? Design your artwork directly in CMYK to get a closer preview of the final print on screen. We're happy to help with colour specifications – just get in touch before placing your order.

We recommend a minimum resolution of 300 dpi (dots per inch). This is the general standard in the printing industry and ensures sharp, professional results for brochures, business cards, posters and other print products.
Images below 150 dpi can easily appear blurry, grainy or pixelated when printed. This reduces the quality of the printed product and the professional appearance of your marketing materials.
If you're unsure about image quality, send the file for review before confirming your order – we'll help assess whether the resolution is sufficient for printing.
aDigi offers a versatile selection of print products for businesses, organisations and event organisers. All products are designed, ordered and delivered through the same online store.
As a digital print house, aDigi is well suited for both small and medium-sized print runs. Many products are ready within 24 hours of receiving the print-ready files.
Select a product from the left panel and choose one of the following options for design and customization:
Edit products in the Design Studio using various tools and create your own designs.
Upload your own image files (JPG, JPEG, GIF, PNG, EPS, AI, PDF, PSD) directly to the product.
Choose from hundreds of ready-made templates and edit them in the Design Studio.
Printing papers are classified by their weight in grams per square metre (g/m²). A higher gsm value means a thicker and sturdier paper.
Not sure which paper grade to choose? Get in touch and we'll help you decide.
The paper finish affects gloss, colour reproduction and readability. The right choice depends on whether your print product emphasises images and colours or text and content.
The decision should be based on the intended use of the print product and the look you're after. If you're unsure, get in touch – we'll help you pick the right paper.
Creating an account in the aDigi online store is quick and easy. With a customer account, you can place orders, track their progress, and save your company details for future purchases.
✅ Tip: You can also log in quickly using your Google or Facebook account directly from the login page.
Updating your contact details is important to ensure that orders, invoices, and deliveries are sent to the correct address. You can easily update your information in the aDigi online store by following these steps:
If you also need to update your company's billing or shipping address, make sure the details are correct before placing your next order. This helps you avoid delays and unnecessary shipping costs.
If you encounter any issues while updating your contact details, please contact our customer service: adigi@adigi.fi or call +358 9 737 001.
Updating your password improves the security of your customer account and helps protect your orders, billing details, and shipping addresses. We recommend changing your password regularly, especially if you suspect that your account security may have been compromised.
If you’ve forgotten your password, use the "Forgot Your Password?" feature on the login page to receive a password reset link via email.
Deactivating your account is a permanent action that will result in the loss of all saved information, including your order history and design templates. We recommend downloading and saving any important files before proceeding with account deactivation.
If you decide to return as a customer later, please contact our customer support team: adigi@adigi.fi or call +358 9 737 001. We will help you with reactivating your account.
You have the freedom to personalize any product from our selection.
❓ What is the difference between smooth and matte paper?
✅ Answer: The surface finish of the paper affects its gloss, color reproduction, and readability.
📌 Smooth paper (silk, semi-gloss)
📌 Matte paper
💡 Which one to choose?
Both options have their strengths, so the choice depends on the intended use and desired look of your print product. 😊
✅ Image quality directly affects the sharpness and clarity of the print. Low-resolution images may appear blurry and pixelated, reducing the final print quality.
📌 How to ensure high print quality?
📌 Easy way to check image quality:
💡 If you're unsure about your image quality, you can send it to us for review, and we will verify if it is suitable for printing!
✅ Billing Instructions:
Dear Partner,
aDigi Oy (Business ID: 0850884-5) processes incoming purchase invoices electronically. We kindly ask you to send invoices primarily as e-invoices.
📌 E-invoicing details:
📌 Alternative billing method:
💡 If you have any questions regarding invoicing, please feel free to contact us via email or phone.
A flyer is a single-sided or double-sided promotional leaflet that helps you reach your target audience quickly and affordably. It's one of the most cost-effective ways to advertise a product, service or event.
You can order flyers from aDigi's online store – printed in Helsinki and delivered quickly across Finland. Browse our flyer range.
We offer flyers in three sizes: A6 (105 × 148 mm), A5 (148 × 210 mm) and A4 (210 × 297 mm).
Choose the size and quantity, upload a print-ready file, select paper type and finishing – then confirm the order and we’ll take care of the rest.
We offer matte, glossy and recycled paper options.
Yes! Upload your own PDF file and we will check it before printing to ensure the best result.
Make sure the resolution is at least 300 dpi, the colors are in CMYK, and proper bleeds are included.
Our flyers are produced quickly, often within 24 hours. Delivery time depends on the chosen shipping method.
Yes. You can choose either single-sided or double-sided printing depending on your needs.
Yes. We review your file before printing, and you can request a preview if needed.
Send your file to us for review – we will make sure it is suitable for printing.
You’ll get a professional look, precise colours and paper with a premium feel. Produced locally in Helsinki – fast deliveries even for last-minute needs.
Well-prepared artwork ensures that the final result looks exactly as you want it. A digital press can print almost anything, but following these guidelines will help you achieve the best possible quality – and speed up production, since the artwork won't need corrections.
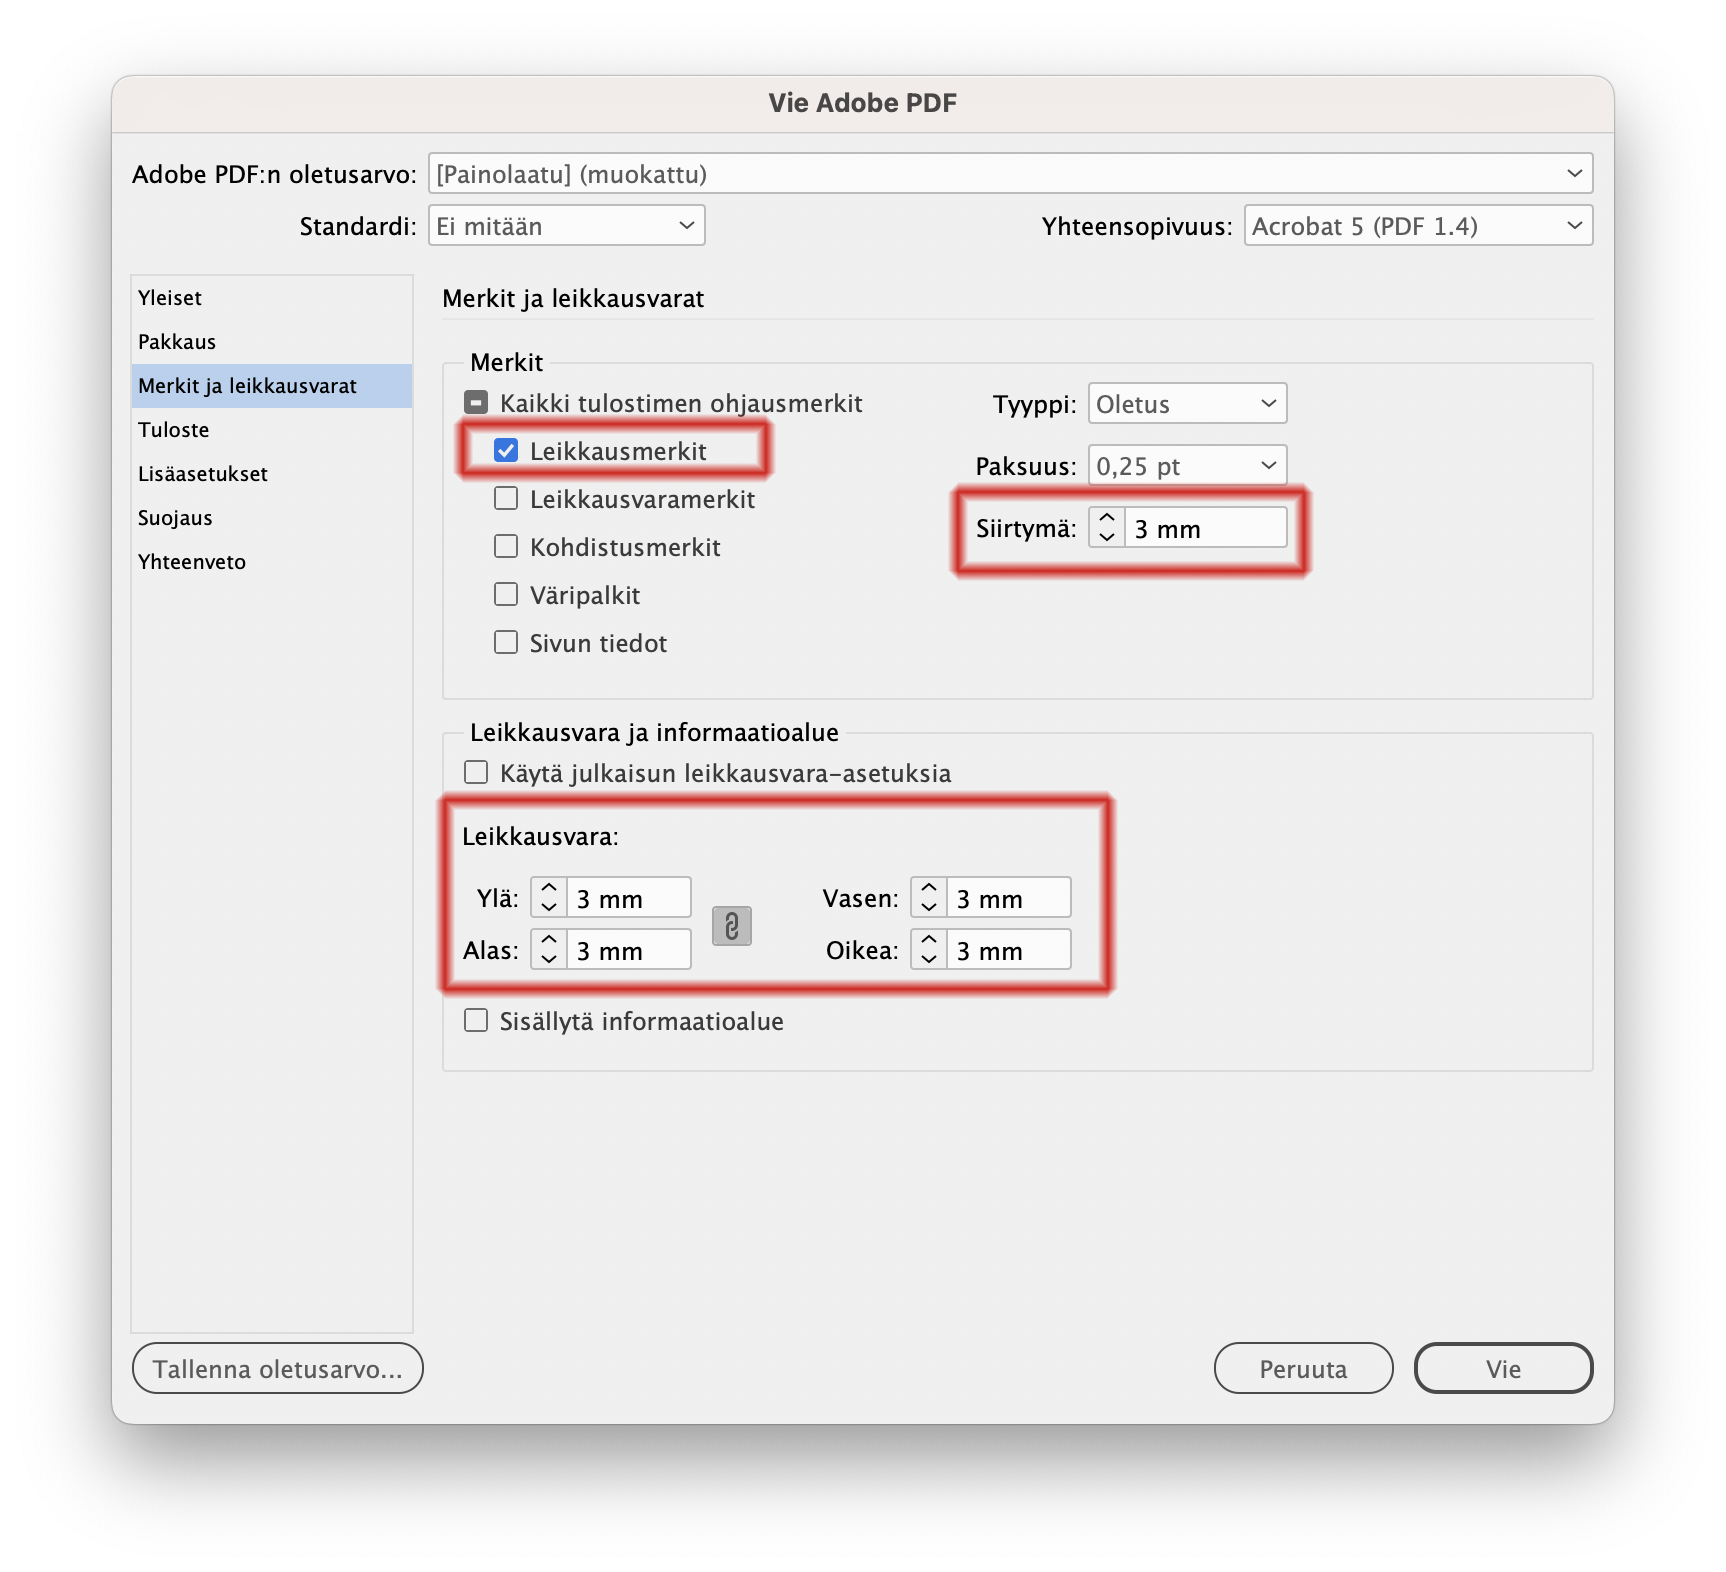
Recommended PDF settings in InDesign:
Most design programs (InDesign, Illustrator, Affinity, Canva Pro) export print-ready PDFs directly with these settings. Include bleeds and crop marks where needed.
Submit your artwork at exactly the final size. For example, an A4 brochure is a 210 × 297 mm document, an A5 flyer is 148 × 210 mm and a business card is 85 × 55 mm. Don't submit artwork larger or smaller than the final size – any scaling reduces quality.
Add 3 mm of bleed to every side so that colours and images extend all the way to the edges without leaving a white border. Example: the actual size of an A4 file with bleeds is 216 × 303 mm.
Keep important elements – text, logos, prices and contact details – at least 3 mm inside the trim line so they don't get cut off during trimming. For larger products such as posters and roll-ups, the recommended safe area is 10–30 mm.
We recommend the CMYK colour space especially when your business has specific brand colours or PMS spot colour definitions. This ensures that colours reproduce in print exactly as intended.
RGB artwork is also fine – we automatically convert files to CMYK for printing. Most modern websites, photos and image editing programs use RGB by default, making it the most natural choice in many cases. Keep in mind that neon and very bright colours may appear duller in print than on screen.
Use a minimum resolution of 300 dpi for images at the final output size. For large-format products (posters, roll-ups, banners) 150–200 dpi is sufficient, since they're viewed from a distance. Whenever possible, supply logos in vector format (.ai, .eps, .svg, .pdf) – this way they stay sharp at any size.
For large black areas, use rich black (e.g. C 60 / M 40 / Y 40 / K 100) to achieve a deep, even result. For small text, use plain black (K 100) – otherwise the text may look blurry or show colour shifts due to misregistration.
Submit pages as single pages, not as spreads. The exception is when the cover is designed as one piece including the spine.
For booklet-format products – brochures and magazines – the total page count must be divisible by four, for example 8, 12, 16 or 20 pages. If the count doesn't work out, a blank page is added at the end if needed.
Unsure about your artwork? Send the file for review before ordering – we'll quickly let you know whether it's print-ready or needs minor corrections. This is a free service and saves time on both sides.
aDigi Print House in Helsinki offers a wide range of print products in various sizes and high-quality materials. Choosing the right paper size affects the appearance, cost, and purpose of your printed material. This guide will help you find the perfect combination for flyers, brochures, business cards, and posters.
The A-series is the most common and affordable option. These standardized sizes are easy to source and suitable for almost all types of printed materials.
Brochures, documents, programs
Flyers, cards, small booklets
Postcards, invitations, small ads
Larger brochures, small posters
The B-series is a popular choice for books, membership magazines, and catalogs.
Large posters are highly effective for event marketing and indoor advertising.
Educational posters and large indoor displays
Common event and promotional poster size
Large posters, also fits A-stands
Popular event poster size, also commonly used for A-stands
When you want to stand out, special sizes bring a unique and memorable look to your printed product.
Paper weight is measured in grams per square meter (g/m²). Choose the right thickness based on the purpose of the product:
Surface options: matte, silk matte, recycled paper, Munken qualities
The right size and paper quality make your printed product functional and professional. Consider the purpose, budget, distribution method, and desired impression.
Request a quote – let's design a print product together that supports your brand and leaves a lasting impression.
The purpose of bleeds is to ensure that the printed product looks clean even after trimming. Even a tiny shift during cutting can cause white edges if bleeds are missing from the artwork.
aDigi follows the industry standard: 3 mm bleed on every side.
Example: an A4 file (210 × 297 mm) becomes 216 × 303 mm in its final size with bleeds included.
The bleed is the area outside the trim line, where only the background colour or image extends. The safe area is the area inside the trim line, where important elements stay safe from trimming.
| Program | How to add bleeds |
|---|---|
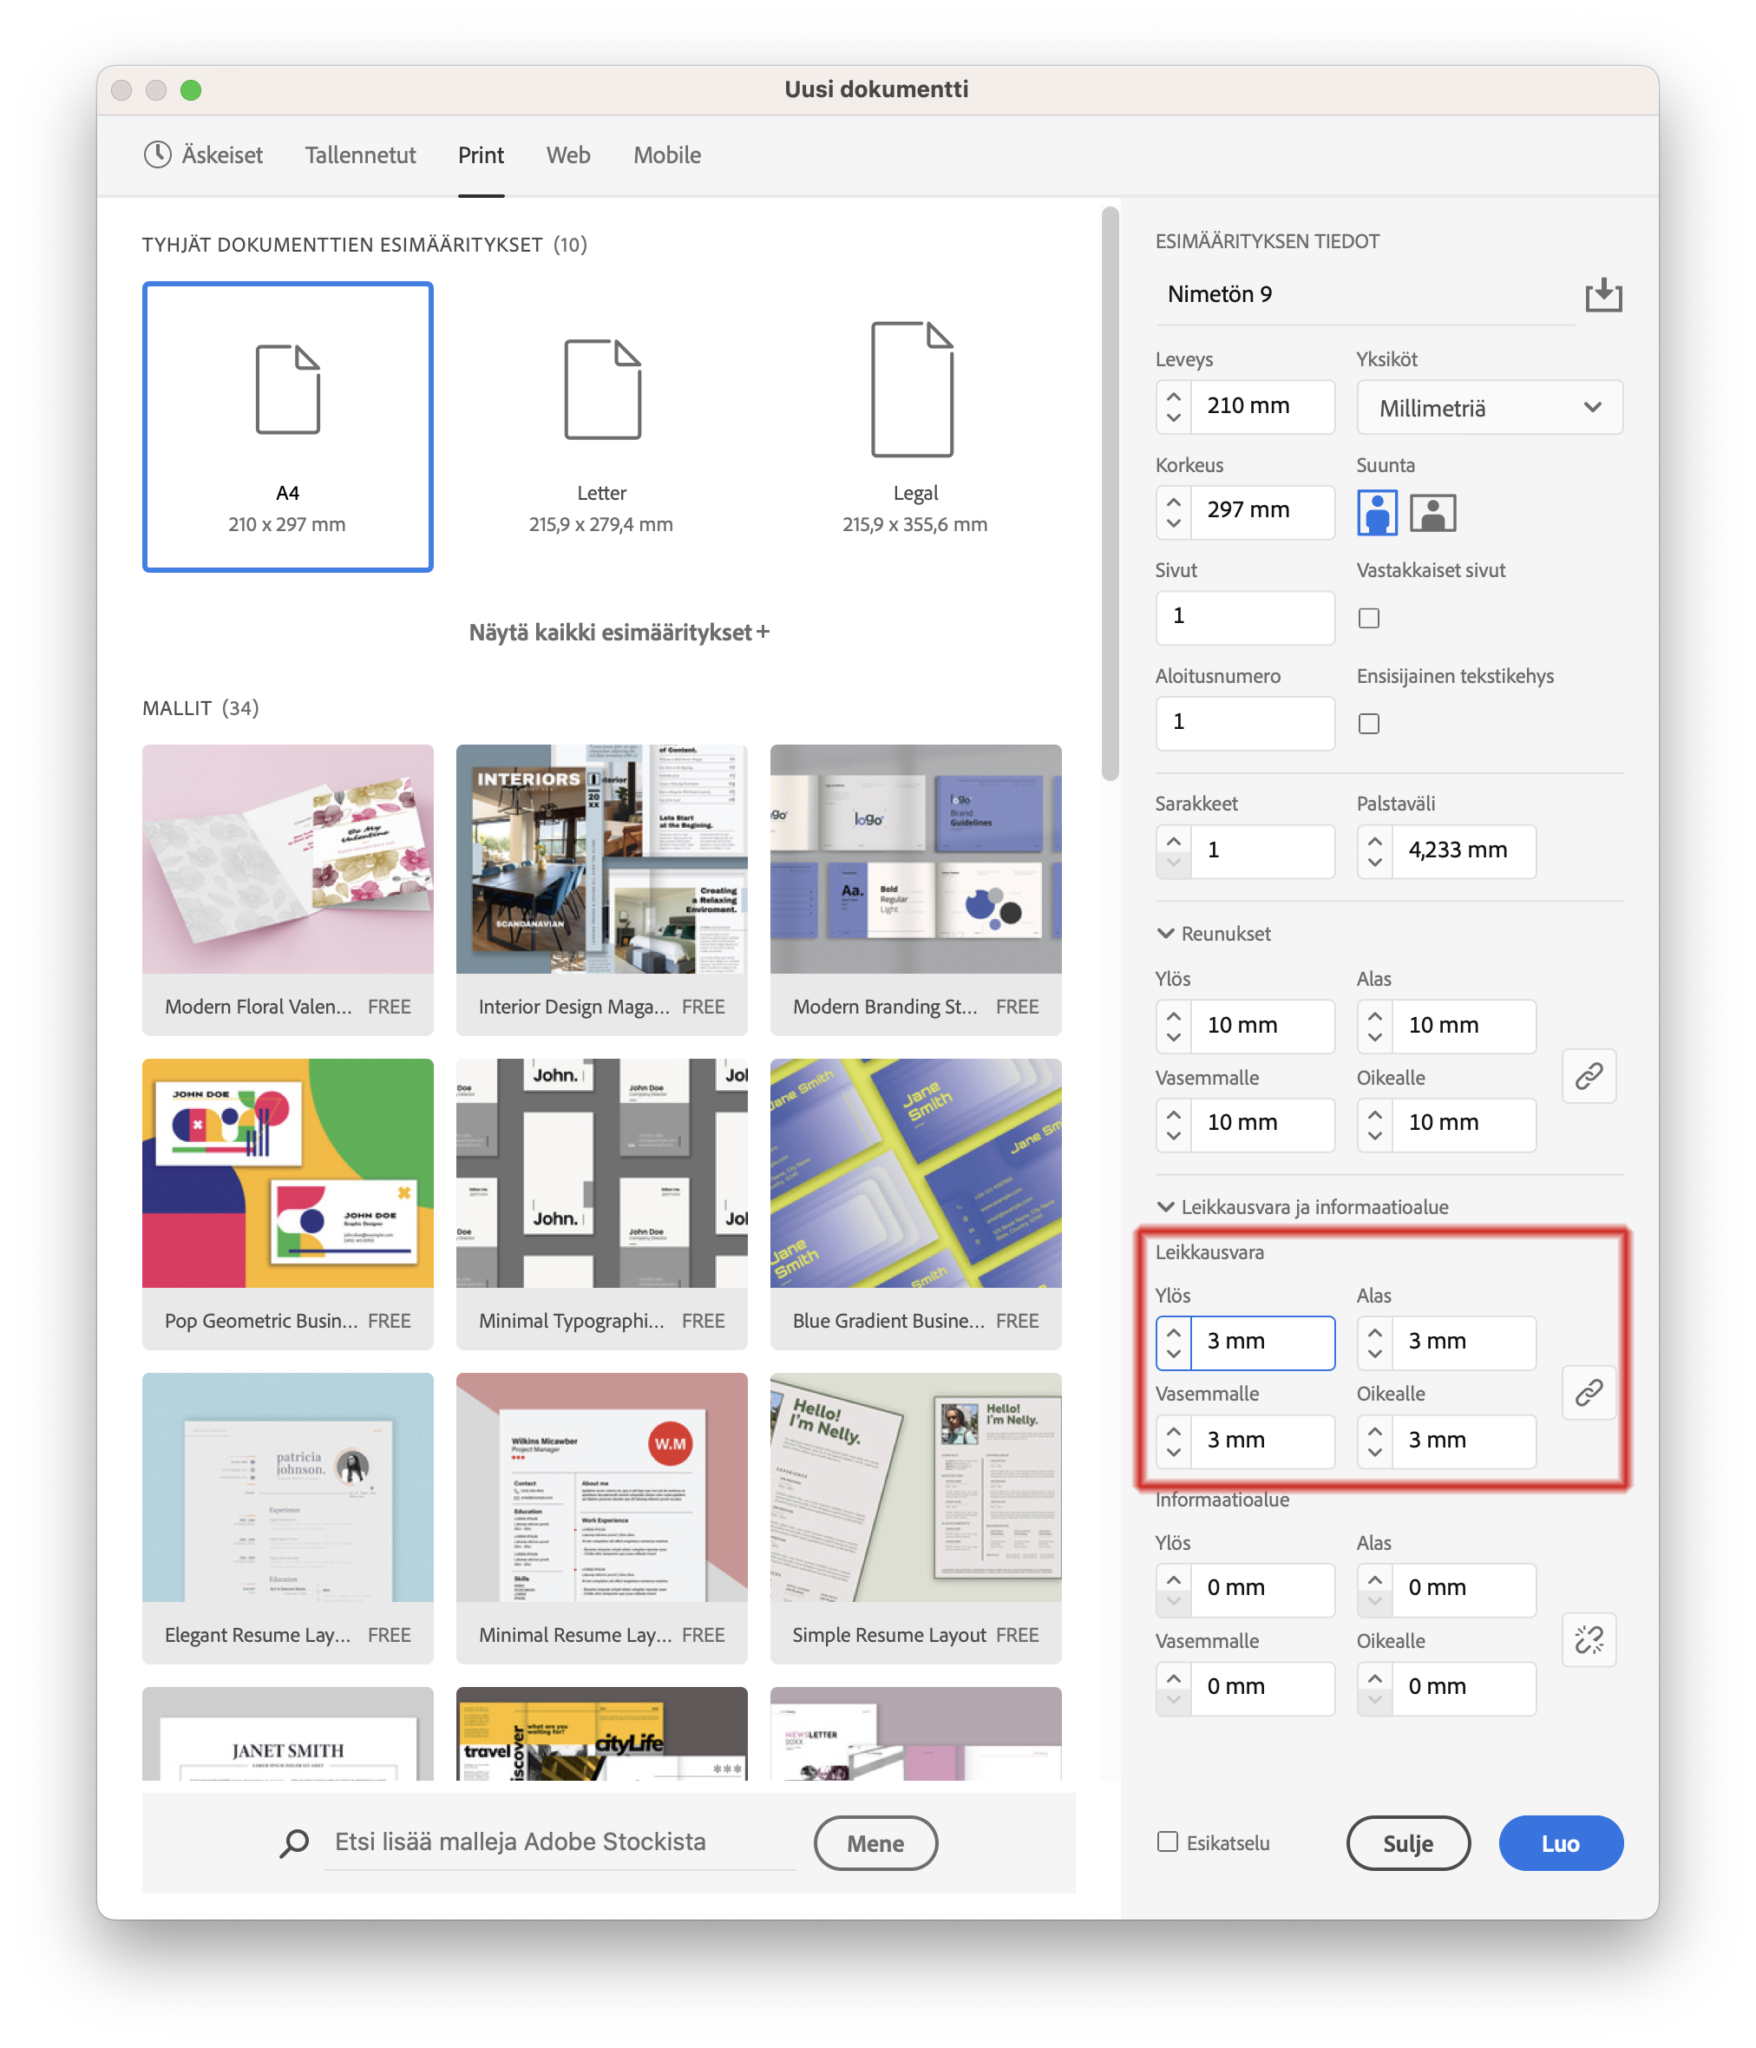
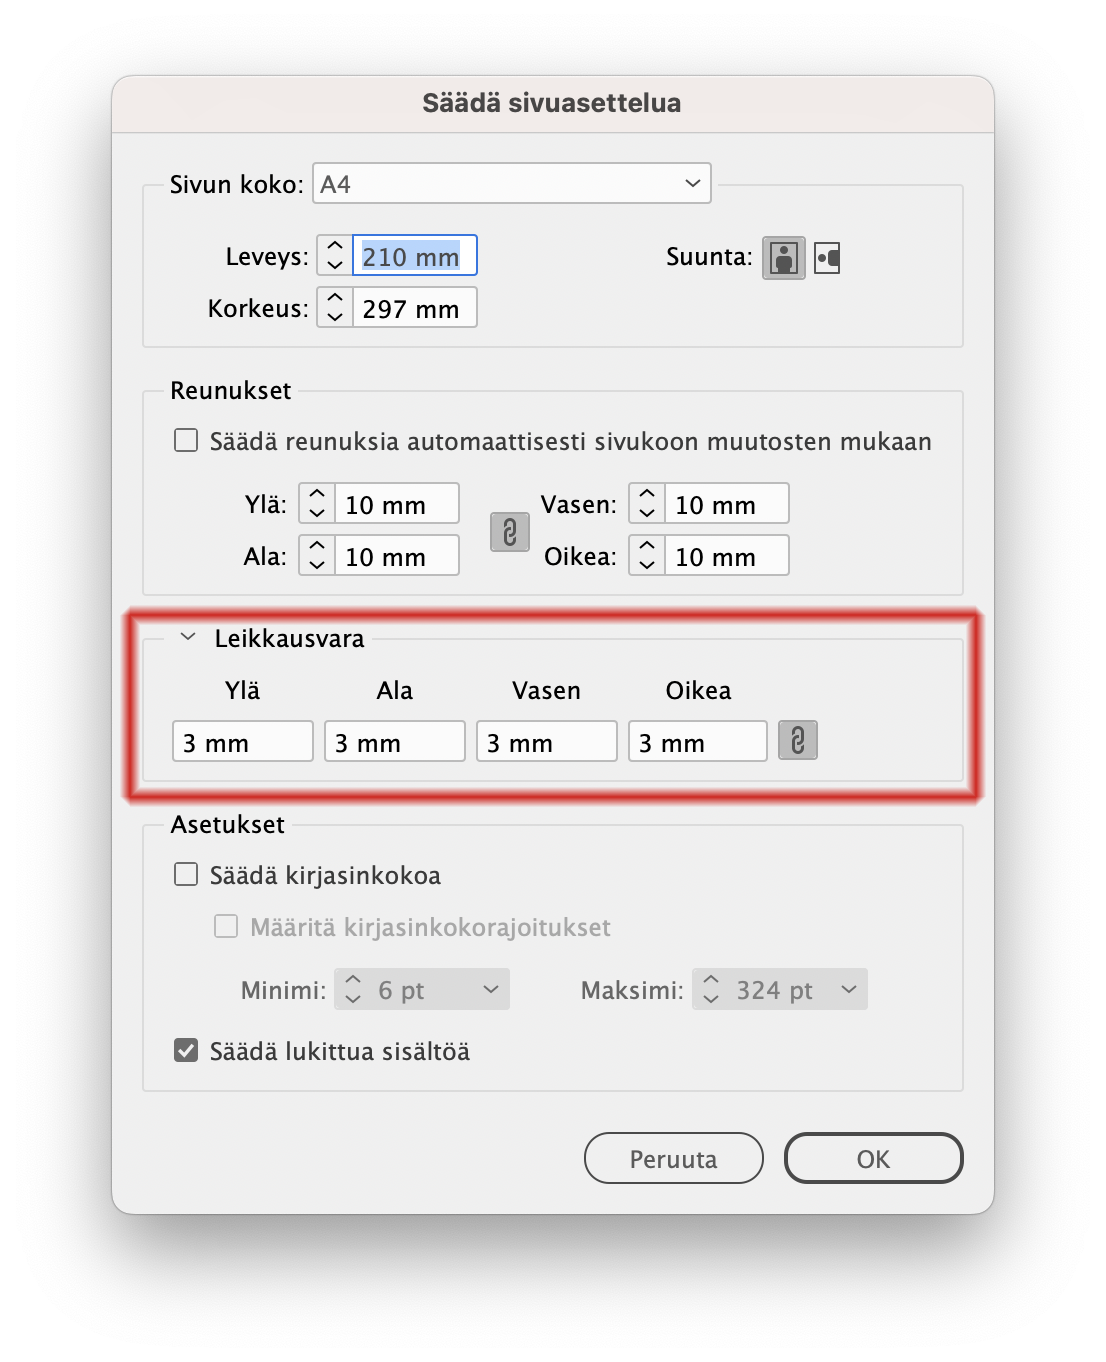
| Adobe InDesign | File → New Document → set Bleed to 3 mm on every side. |
| Adobe Illustrator | File → Document Setup → Bleed 3 mm on every side. |
| Adobe Photoshop | Create the document 6 mm larger (3 mm on every side). Add crop marks during PDF export. |
| Canva (Pro) | File → Show Bleed → drag the background colour past the visible line. When exporting, choose PDF Print and tick Crop marks and bleed. |
| Affinity Publisher / Designer | File → Document Setup → Bleed 3 mm on every side. |
| Microsoft Office, LibreOffice, OpenOffice | Office software doesn't support bleeds natively. Design the background slightly oversized or move the artwork into a design program before PDF export. |
Take bleeds into account right from the start of the design process. Adding them later is time-consuming, and background images may stretch or break unevenly.
Need help? We'll check the artwork for you and assist where needed. Get in touch and we'll make sure the result is just right.
It's best to set up bleeds as soon as you create a new document. This ensures that your printed product looks clean even after trimming. aDigi recommends a 3 mm bleed on every side.
The bleed area appears outside the document as a red frame.
Unsure about the settings? Send a test file for review before ordering – we'll quickly check that the bleeds and other settings are correct.
300gsm matt offset is a thick, sturdy cardstock that gives your printed product a premium feel and an understated, elegant appearance. The matt finish doesn't reflect light – it creates a soft and trustworthy first impression.
Ideal for business cards, invitations, funeral programmes and other formal printed materials where the feel of the paper itself communicates quality.
The thick 300gsm cardstock makes an immediate impression on the recipient – the paper doesn't bend in hand and resists creasing.
An understated and soft appearance with no light reflections. Text remains easy to read in any lighting conditions.
Excellent choice for business cards, invitations, funeral programmes and other occasions where a refined feel matters.
Our papers are FSC® and PEFC™ certified – wood from responsibly managed forests.
The number refers to the paper's grammage – how much one square metre of paper weighs. 300 g/m² is a thick cardstock that feels substantial in hand and is particularly well suited for business cards and invitations.
A matt finish is understated and doesn't reflect light – it gives a softer, more refined feel. A gloss finish brings out colours and creates a more vibrant result, but can produce glare under direct light.
Yes. The matt surface accepts both pencil and most ballpoint or fountain pens well – unlike a glossy surface, where ink can smudge or slide. This makes 300gsm matt a great choice for cards intended to be written on.
Yes. The papers we use are FSC® and PEFC™ certified, which means the wood material comes from responsibly managed forests.
We offer papers and cardstocks in 90gsm, 100gsm, 120gsm, 170gsm, 200gsm, 300gsm and 400gsm. 300gsm is a popular choice for business cards and invitations, while 90–170gsm suits brochures and flyers.
You're welcome to visit our print shop in Hakaniemi, Helsinki – paper materials can be examined in person on weekdays from 8 am to 5 pm. We can also send paper samples by post upon request.
400g matte offset board is a super sturdy and premium-quality option for print materials where first impressions truly matter. It’s designed for products that stay in your customer’s hand — and memory. Perfect for thick business cards, event passes, product tags, and high-end invitations.
Available another weights: 90g, 100g, 120g, 170g, 200g, 300g, and 400g.
A responsible choice: boards are with FSC® and PEFC™ certification.
90g matta offset -paperi on täydellinen valinta painotuotteisiin, joissa on paljon sivuja – kuten ohjeet, raportit, kirjat ja manuaalit. Paperi on ohut mutta laadukas: se pitää painotuotteen kevyenä ja helposti selattavana ilman, että luettavuus kärsii. Mattapinta vähentää heijastuksia, mikä parantaa lukukokemusta erityisesti tekstipainotteisissa julkaisuissa.
Saatavilla myös muissa paksuuksissa: 90g, 100g, 120g, 170g, 200g, 300g ja 400g
Vastuullinen valinta: Kaikki paperit ovat saatavilla FSC®- ja PEFC™-sertifioituina. Valitsemalla sertifioidun paperin tuet kestävää metsänhoitoa.
300g matte offset cardstock is the perfect choice when your printed product needs to be both elegant and durable. This high-quality, sturdy paper creates a lasting first impression, making it ideal for business cards, invitations, memorial service programs, and other formal printed materials where quality matters.
Other available weights: 90g, 100g, 120g, 170g, 200g, 300g, and 400g.
Responsible choice: Papers are available with FSC® and PEFC™ certifications, ensuring sustainable and eco-friendly printing.
Got an event coming up, brochures running out or business cards needed fast? aDigi handles printing and digital print jobs in Helsinki smoothly, with a clean finish and a fast turnaround.
Our printing service is especially suitable for small and medium-sized runs, tight schedules and situations where printed materials need to be ready quickly.
aDigi’s in-house production in Helsinki helps when you need printed products quickly without compromising quality.
Digital printing is at its best when you need high-quality printed materials quickly.
Digital printing is a good choice when you need sharp print quality, clean finishing and a reliable schedule.
If you are not sure which product is the best fit, tell us how you plan to use it. We will help you choose the most practical option.
For making a strong first impression and sharing your contact details easily.
A portable display solution for trade fairs, presentations and events.
If your file is a print-ready PDF with the required bleed, urgent jobs can often be completed quickly. Production time depends on the product, quantity and current production situation.
A print-ready PDF has the correct size, sufficient image resolution, embedded or outlined fonts and the required bleed for designs that extend to the edge.
Yes, if the background, image or colour extends to the edge of the finished product. The usual recommendation is 2–3 mm bleed.
Yes, but the fastest and most reliable option is to supply a print-ready PDF. aDigi can also help check your artwork if needed.
A good general recommendation is 300 dpi at final size. For large-format prints, a lower resolution may be sufficient, but text and logos should always remain sharp.
Which size, which style—windowed or non-windowed? This page gives you quick clarity for choosing and ordering the right envelopes.
Tip: if you send lots of invoices, a window envelope saves time. If you send quotes/contracts, a clean non-window envelope often looks more premium.
C4 is the safe choice: A4 goes in flat, no folds.
C5 is very common: A4 folded once (to A5) fits neatly.
DL (C65) is the classic invoice / letter envelope.
Windowed = speed and efficiency.
Non-window = a more premium impression.
| Size | What fits inside? | Typical use |
|---|---|---|
| C4 | A4 without folding | Contracts, reports, official documents |
| C5 | A4 folded once (A5) | Cover letters, brochures, invitations |
| DL (C65) | A4 folded twice | Invoices, notices, bulk mailings |
Typically, the minimum is 500 pcs (one box). Smaller runs like 25–250 pcs are possible, but the unit price is usually higher.
Typical turnaround for printed envelopes is about 2–4 business days after artwork approval. If you’re in a hurry, mention it right away when ordering and we’ll find the fastest sensible option.
Window envelopes are best for an efficient invoice and bulk-mail process (the address shows through the window). Non-window envelopes work better when you want a more premium first impression (quotes, contracts, invitations).
The most common and clearest layout is logo in the top-left corner, with company name and return address next to or under it. You can also add phone and website if you want.
Print-ready PDF is usually the safest option. You can also send your logo and we can help set it up print-ready.
CMYK is recommended for print for the most predictable colour reproduction. RGB files are also OK.
Safe area means: keep important elements (logo, text) far enough from the edges. A common guideline is about 10–20 mm from the edge. Printing typically requires roughly 5 mm of white margin near edges.
If sustainability is part of your brand (and today it often is), a 100% recycled envelope is a strong, easy signal of your values—and it looks great, too. Availability can be limited. Standard envelopes are often thicker and come in a wider range of options.
Yes—many customers order a full “brand stationery set” at once (e.g., business cards, brochures, notepads). It keeps the look consistent and saves time.
Choose based on what you’re mailing—and order directly from the webshop:
If you want, I can also make a version with a “choose your envelope in 3 questions” mini-guide (contents → window or not → paper/feel).
The right roll-up size depends on the space and how it will be used. 85×200 cm is the most popular and safest all-round size for trade fairs, shops, lobbies and events.
Roll-ups are usually printed on blockout material, which prevents show-through. The recommended file format is a print-ready PDF.
Got an event coming up soon? Running out of business cards right before an important sales week? When deadlines are tight, you need one thing: high-quality print products delivered on time — without hassle.
aDigi is a Helsinki-based printing partner that’s fast, flexible, and easy to work with. We help companies look professional everywhere they show up.
Upload a print-ready PDF — or let us help you prepare the file professionally.
We review the technical details to make sure everything prints perfectly.
Printed in Helsinki → delivered quickly anywhere in Finland.
Many standard products are ready within 1–3 business days, and urgent jobs can often be produced even faster. Just ask about express options.
We recommend a print-ready PDF with bleed and correct resolution. If you're unsure, you can request a file check before production.
Yes — we’re happy to help you choose the best option and show sample materials when needed.
Not really. Digital printing allows small batches and even single items for many products.
Absolutely. We deliver quickly across all of Finland.
Use CMYK artwork, and for brand-critical colors, we recommend ordering a proof before the full print run.
aDigi makes printing simple: speed, quality, and personal support — all from one trusted team.
Want your card to look great and fit in a wallet? Then focus on three things: the right size, enough bleed, and a sensible safe area.
The most common and safest choice in Finland (and across Europe) is 85 × 55 mm. It matches the size of a credit card, so people are more likely to keep it instead of losing it at the bottom of a pocket.
This size used to be more common, but 85 × 55 mm is now the mainstream standard.
| Size | Best for | Pro tip |
|---|---|---|
| 85 × 55 mm | General use, sales, networking | The safest choice – “fits everywhere.” |
| 90 × 50 mm | When you want a slightly different feel | Keep typography airy so it won’t look cramped. |
| 55 × 55 mm (square) | Visual industries, minimalist branding | Limit text – logo + one core message. |
| 170 × 55 mm (fold to 85 × 55) | Appointments, loyalty cards, mini-brochure | Use inner pages for services, pricing, QR. |
| 70 × 28 mm (mini card) | Product inserts, a “hook” giveaway | Works well as a QR + URL/social card. |
If your background or image goes to the edge, extend it into the bleed area. This prevents unwanted white edges after trimming.
Keep logos, names and contact details clearly inside the edge (about 3–5 mm from the trim line) so nothing important gets too close to cutting.
InDesign/Illustrator: set bleed in document settings. Canva: export “PDF Print” and enable “Crop marks and bleed.”
Send your logo + text + wishes, and we’ll clean up the layout professionally.
For most people, 85 × 55 mm is the best choice because it’s the standard size and fits a wallet like a credit card.
Typically 2 mm on each side. Example: 85 × 55 mm finished size → artwork with bleed is usually 89 × 59 mm.
The safe area is about 3–5 mm inside the trim. Keep text and logos inside it so nothing important gets cut off.
Yes. Export as “PDF Print” and enable “Crop marks and bleed.”
A good rule of thumb is 300 dpi at final size for sharp print quality.
Yes, if you need extra space (appointments, services, loyalty info). A common format is 170 × 55 mm, folded to 85 × 55 mm.
When size + bleed + safe area are correct, your business card instantly looks more premium.
aDigi Printing House – business cards produced in Helsinki. If you want, we can check your file before printing.
Planning a wedding? Or a big celebration where you want guests to reserve the date early?
A Save the Date card is a stylish first announcement: guests mark the day now – the official invitation follows later.
Tip: If your wedding is in peak season or far away, sending a Save the Date early increases attendance significantly.
A Save the Date is a simple pre-notice: date + names + location (and optionally “invitation to follow”). It helps guests block the date before their calendars fill up.
Choose the size based on whether you want a compact card or a bold design statement.
A6 is the most popular and easiest to mail. A5 gives more space for photos, while 99×210 looks modern and square formats feel trendy.
Typically 6–12 months before the wedding. For destination weddings or peak season, even earlier is recommended.
Yes. Especially A6 works perfectly as a postcard and often becomes a keepsake.
No worries — we can help finalize your design or create the full layout to match your wedding style.
A print-ready PDF is the safest option. When size, bleed and resolution are correct, production is fastest.
Absolutely. QR codes are great for wedding websites, RSVP pages or accommodation info — just keep them large and clear.
A Save the Date card is a small step with a big impact — lock the day in, start the mood early, and reduce planning stress.
aDigi Printing House – Save the Date cards and wedding print products, printed fast in Helsinki and delivered across Finland.
Looking for a more sustainable option for brochures, business cards or envelopes? Environmentally friendly paper is a smart choice that supports both your brand and everyday sustainability goals.
This guide explains how to choose a more environmentally responsible paper and printing solution without compromising quality.
Sustainable printing is not just about one paper grade. It is a combination of responsible forestry, recyclable materials and sensible production quantities.
FSC® and PEFC™ certified papers indicate that the raw materials come from responsibly managed forests.
aDigi is a modern printing house in Helsinki. For us, sustainability is built on responsible material choices, local production and efficient print runs.
Not necessarily. FSC® and PEFC™ certified papers are often very cost-effective. Fully recycled specialty boards may cost slightly more, but pricing depends on the application and quantity.
Yes. Modern digital printing produces sharp text and excellent colour reproduction on recycled materials as well.
Both certifications ensure responsible forest management. FSC® is internationally recognised, while PEFC™ is particularly common in Finland.
Choose paper-based solutions and avoid unnecessary plastic coatings, laminates or multi-layer constructions whenever possible.
We print locally in Helsinki, use certified materials and help customers select the most suitable environmentally responsible options for each project.
Need stickers for products, packaging, devices or windows?
At aDigi, you get professional logo stickers and special-purpose decals — printed in Helsinki using Mimaki UV inkjet technology.
Tip: Tell us use case + size + quantity + indoor/outdoor + surface type and we’ll recommend the best sticker material and adhesive.
Use case, size, quantity, indoor/outdoor, surface type, and whether you need removable or permanent adhesive.
Yes. Mimaki UV printing is ideal for small and medium sticker quantities and fast campaigns.
Removable is best for short-term campaigns, permanent for long-lasting signage and devices. For difficult surfaces, we’ll recommend the right solution.
Clear vinyl is stylish, but light colours and white elements need special consideration. Tell us your design goals and we’ll advise.
Use a clean surface, install carefully, and choose air-release vinyl for larger decals.
We recommend a print-ready PDF. For shape-cut stickers, include a vector contour cut path.
Tell us where the sticker will be used, and we’ll help you choose the best material and adhesive.
Upload your print-ready PDF file here. If your artwork is not ready yet, you can add the product to your cart and upload the file later.
The preview only displays the first page of the PDF. The complete file, including all pages, will still be uploaded correctly.
PDF, jpg, jpeg, png, gif, ai, eps, psd, tiff, tif, svg, avif, heic, heif, zip, rar
Other file formats should preferably be compressed into a ZIP archive before uploading.
Jos huomaat virheen, ota yhteyttä heti. Selvitetään, johtuuko virhe aineistosta, tilauksen tiedoista vai tuotannosta. Mitä nopeammin asia tulee esiin, sitä helpompi se on ratkaista. Ota yhteyttä.
Voit ottaa yhteyttä verkkokaupan, sähköpostin tai puhelimen kautta. Jos asialla on kiire, kerro heti tuote, määrä, toivottu valmistumisaika ja toimitustapa. Ota yhteyttä.
aDigi Painotalo sijaitsee Helsingissä Hakaniemessä. Sijainti on kätevä noutoihin, kiireellisiin töihin ja pääkaupunkiseudun yritysasiakkaille. Ota yhteyttä.
Soita, jos aikataulu on kiireellinen tai tarvitset nopean varmistuksen. Lähetä sähköposti tai tarjouspyyntö, jos työssä on paljon teknisiä tietoja, liitteitä tai useita tuotteita. Ota yhteyttä.
aDigi Painotalo
Saariniemenkatu 6, 00530 Helsinki
Open weekdays 8–17
aDigi Oy
Business ID: 0850884-5
Print products since 1991
Fast courier deliveries in the Helsinki region and Posti Express throughout Finland